Download pkg from https://apps.cloud.blackmagicdesign.com/davinci-resolve
1 | git clone https://aur.archlinux.org/davinci-resolve.git |

Download pkg from https://apps.cloud.blackmagicdesign.com/davinci-resolve
1 | git clone https://aur.archlinux.org/davinci-resolve.git |

FCSGG (Fully Convolutional Scene Graph Generation) is a PyTorch implementation of the paper “Fully Convolutional Scene Graph Generation” published in CVPR 2021. The project focuses on scene graph generation, which is the task of detecting objects in an image and identifying the relationships between them.
Architecture:
Key Features:
Dataset:
Model Components:
Utilities:
fcsgg/: Main module containing model implementation
configs/: Configuration files for different model variants
tools/: Training, evaluation, and visualization scripts
GraphViz/: Visualization tools for scene graphs
The project implements a fully convolutional approach to scene graph generation, which differs from traditional two-stage methods. Instead of first detecting objects and then predicting relationships, it uses a one-stage detector to simultaneously predict objects and their relationships in a fully convolutional manner.
The repository provides several pre-trained models with different backbones:
These models achieve competitive performance on the Visual Genome dataset for scene graph generation tasks.
The project provides tools for training, evaluation, and visualization of scene graphs. It requires the Visual Genome dataset and can be run using Docker or directly with PyTorch.
In summary, FCSGG is a comprehensive implementation of a state-of-the-art approach to scene graph generation using fully convolutional networks, offering various model architectures and training configurations.
FCSGG is built on top of Detectron2, Facebook’s object detection framework, and leverages many of its components while extending it for scene graph generation. Here’s a detailed breakdown:
Meta Architecture: FCSGG registers a custom meta architecture called “CenterNet” with Detectron2’s META_ARCH_REGISTRY. This extends Detectron2’s modular architecture system while maintaining compatibility.
Backbone Networks: FCSGG uses Detectron2’s backbone networks (ResNet, etc.) directly and also implements custom backbones like HRNet while following Detectron2’s backbone interface.
Feature Pyramid Networks (FPN): The repository uses Detectron2’s FPN implementation and extends it with custom variants like BiFPN and HRFPN.
YAML Configuration: FCSGG adopts Detectron2’s YAML-based configuration system, extending it with custom configurations for scene graph generation through add_fcsgg_config().
Command Line Arguments: The training script uses Detectron2’s default_argument_parser() to maintain the same command-line interface.
Dataset Registration: Visual Genome dataset is registered with Detectron2’s DatasetCatalog and MetadataCatalog, making it available through Detectron2’s data loading pipeline.
Custom Dataset Mapper: FCSGG implements a custom DatasetMapper class that extends Detectron2’s mapper to handle scene graph annotations.
Data Loaders: The repository uses Detectron2’s build_detection_train_loader and build_detection_test_loader with custom mappers.
Trainer Class: FCSGG extends Detectron2’s DefaultTrainer class to customize the training loop, evaluation metrics, and data loading.
Checkpointing: The repository uses Detectron2’s DetectionCheckpointer for model saving and loading.
Distributed Training: FCSGG leverages Detectron2’s distributed training utilities through detectron2.utils.comm and the launch function.
Custom Evaluators: The repository implements a custom VGEvaluator for scene graph evaluation while following Detectron2’s evaluator interface.
Event Storage: FCSGG uses Detectron2’s event storage system for logging metrics during training.
Visualization Tools: The repository leverages Detectron2’s visualization utilities for debugging and result analysis.
Custom Heads: While using Detectron2’s architecture, FCSGG implements custom prediction heads for relationship detection.
Scene Graph Structures: The repository defines custom data structures for scene graphs that integrate with Detectron2’s Instances class.
Loss Functions: FCSGG implements specialized loss functions for scene graph generation while maintaining compatibility with Detectron2’s loss computation framework.
Submodule Integration: Detectron2 is included as a Git submodule, ensuring version compatibility.
Build Process: The installation process includes building Detectron2 from source to ensure proper integration.
In summary, FCSGG uses Detectron2 as its foundation, leveraging its modular architecture, data handling, training infrastructure, and configuration system while extending it with custom components for scene graph generation. This approach allows FCSGG to benefit from Detectron2’s robust implementation and optimizations while adding specialized functionality for relationship detection between objects.
Official repo:
https://github.com/liuhengyue/fcsgg
Our repo:
https://github.com/PSGBOT/KAF-Generation
My venv: fcsgg
1 | git clone git@github.com:liuhengyue/fcsgg.git |
Datasets:
1 | cd ~/Reconst |
Download the scene graphs and extract them to datasets/vg/VG-SGG-with-attri.h5.
1 | AttributeError: module 'PIL.Image' has no attribute 'LINEAR'. Did you mean: 'BILINEAR'? |
LINEAR-> BILINEAR: commit
在尝试训练的过程中报错:
1 | File "/home/cyl/Reconst/fcsgg/fcsgg/data/detection_utils.py", line 432, in generate_score_map |
modify detection_utils.py: commit
首先更改训练的配置文件./config/quick_schedules/Quick-FCSGG-HRNet-W32.yaml, (原文件使用预训练的参数)
1 | MODEL: |
更改为train from scratch
1 | MODEL: |
再运行:
1 | python tools/train_net.py --num-gpus 1 --config-file configs/quick_schedules/Quick-FCSGG-HRNet-W32.yaml |
成功训练✌
1 | ... |
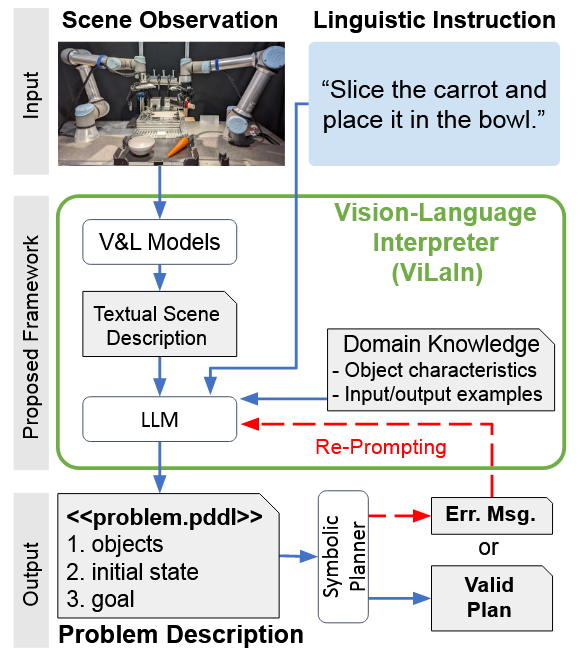
See [[FCSGG Repo Explanation]]

(Mindmap) Part-level Scene Understanding for Robots
 Part-level Scene Understanding for Robots/Pasted_image_20250414142333.png)
A scene graph is a structural representation, which can capture detailed semantics by explicitly Modeling:
1 | pip install omegaconf |
1 | from omegaconf import OmegaConf |
You can create OmegaConf objects from multiple sources.
dict1 | conf = OmegaConf.create({"k" : "v", "list" : [1, {"a": "1", "b": "2", 3: "c"}]}) |
list1 | conf = OmegaConf.create([1, {"a":10, "b": {"a":10, 123: "int_key"}}]) |
yaml1 | conf = OmegaConf.load('source/example.yaml') |
dot-list1 | dot_list = ["a.aa.aaa=1", "a.aa.bbb=2", "a.bb.aaa=3", "a.bb.bbb=4"] |
1 | sys.argv = ['your-program.py', 'server.port=82', 'log.file=log2.txt'] |

“涌现”(Emergence)最早起源于哲学领域。19世纪,英国哲学家乔治·亨利·刘易斯次用这个词来描述那些无法通过组成部分的性质解释的整体特性,即“整体大于部分之和”的现象。