## Intro
尽管现有的视觉语言模型(VLM)在2D视觉语言的理解中取得了长足的进步,但与使用3D表示室内场景任务的人相比,它们对持续3D空间信息的掌握有限通常会使它们的有效性较小。
最近的一些文章[[3D-LLM]]以文本和其他方式桥接3D视觉信息显示出3D视觉理解和推理的潜力。但是,它们主要处理静态3D场景,这对于涉及场景变化的互动计划的适应性较低。
本文提出的模型主要想解决3D密集标注和交互式规划。
结合
- egocentric(crucial for immediate updates during object interactions and for localizing the agent within the scene)
- comprehensive(provides temporal persistent and multi-view consistent details of the entire 3D scene)
scene-level的信息。
需要align the dense 3D visual information with the textual embedding space of a pre-trained LLM。3D点集由于其连续坐标系以及需要适应场景状态变化的表示形式而构成了一个独特的问题
3D-VQA
VLN(Visual-Language Navigation)
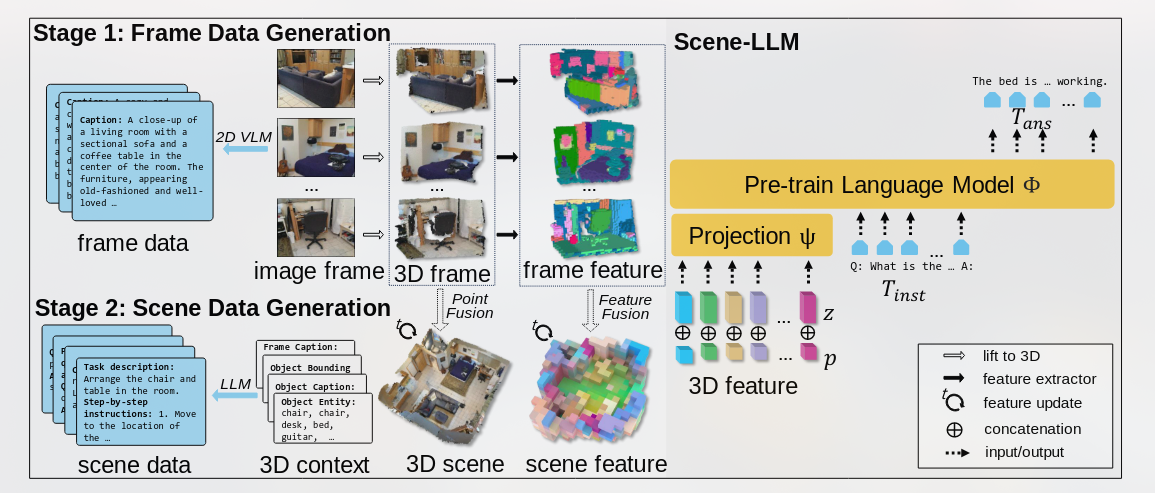
3D-Visual-Language Data Generation
和[[3D-LLM]]一样,都是多视角采集D-RGB信息然后整合为3D frame
标注信息来自于Mini-GPT-V2(capable of generating captions and object descriptions from images by using caption and grounded caption identifiers)。
3D-frame
Uses image frames and a 2D-VLM(Mini-GPT-V2) to generate frame descriptions
Scene Data
3D场景数据是通过基于其相机姿势汇总的3D帧来重建
使用Llama-2-Chat-70B [65]生成场景的语言注释
prompted with a mix of context data including generated frame captions, frame object descriptions, annotated object lists, and annotated bounding boxes. These prompts lead to diverse instruction-following data types like dense caption, object caption, task decomposition, functionality enhancement, question-answering, and human-robot dialogues
From Vision Studio
对于VLM生成内容使用的self-checking: [83]
Scene-LLM
场景-LLM是一种3D视觉语言模型(VLM),具有简单而有效的体系结构,旨在理解以基于本体和场景级别的3D视觉信息,使其能够成功执行交互式计划任务。本节概述了3D视觉特征提取过程,我们的模型的体系结构,3D视觉信息与数据集的对齐以及使用Scene-LLM进行推理。
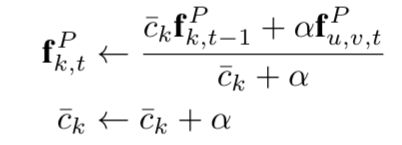
Employ visual language semantic features [51] to represent 3D visual semantics
- first extracting pixel-wise CLIP features from each image and then aggregating these into a 3D point set [[ConceptFusion]]
Tokenize 3D visual features for LLM input:
- hybrid point-voxel representation (need for dense 3D visual information, support for interactive updates, and manageable token lengths for the LLM)
网络大体上分为两层:
Projection layer
To bridge 3D visual tokens(F) with the LLM’s tokenized space
FC(1030, 768)->GELU->FC(768,768)
LLM
Llama-2-7b as the foundational LLM backbone
训练
Stage 1: Pretraining for Feature Alignment
在两个坐标系统(camera和世界坐标)下使用3D帧数据,以确保场景-LLM理解以自我为中心和以场景为中心的观点。
在此阶段,仅训练了projection layer,可以有效地对齐具有文本特征的3D视觉特征,同时保持LLM参数(φ)不变。
Stage 2: Finetuning
优化Scene-llm,以准确响应用户说明。我们使用标识符令牌“我看到”将3D帧语言和3D场景语言数据合并到前言。文本描述分为指令($T_{INST}$)及其相应的响应($T_{ANS}$)。利用转换后的3D视觉令牌($T_{3D}$)和指令令牌($T_{INST}$),我们的目标是微调LLM(φ)以自动生成$T_{ANS}$.
在这里,我们共同微调了投影层和LLM,由θ= {ψ,φ}表示