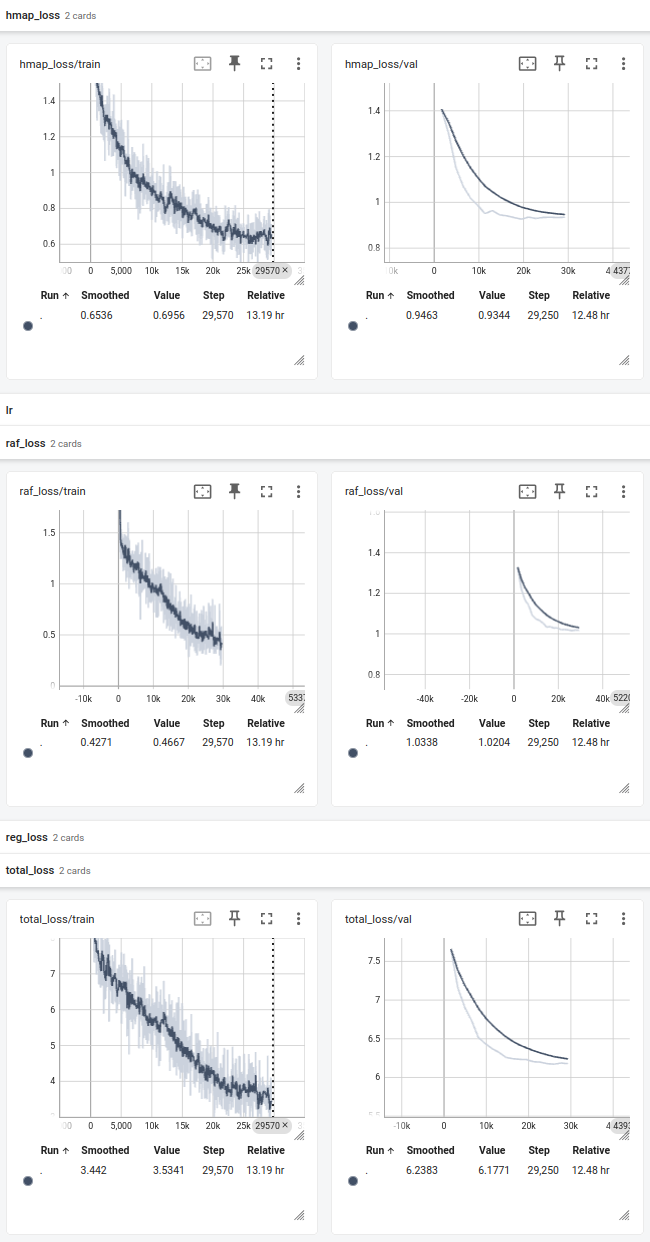
For the figure, the each step corresponds to a processed batch(16).
For the figure, the each step corresponds to a processed batch(16).
Official repo:
https://github.com/liuhengyue/fcsgg
Our repo:
https://github.com/PSGBOT/KAF-Generation
My venv: fcsgg
1 | git clone git@github.com:liuhengyue/fcsgg.git |
Datasets:
1 | cd ~/Reconst |
Download the scene graphs and extract them to datasets/vg/VG-SGG-with-attri.h5.
1 | AttributeError: module 'PIL.Image' has no attribute 'LINEAR'. Did you mean: 'BILINEAR'? |
LINEAR-> BILINEAR: commit
在尝试训练的过程中报错:
1 | File "/home/cyl/Reconst/fcsgg/fcsgg/data/detection_utils.py", line 432, in generate_score_map |
modify detection_utils.py: commit
首先更改训练的配置文件./config/quick_schedules/Quick-FCSGG-HRNet-W32.yaml, (原文件使用预训练的参数)
1 | MODEL: |
更改为train from scratch
1 | MODEL: |
再运行:
1 | python tools/train_net.py --num-gpus 1 --config-file configs/quick_schedules/Quick-FCSGG-HRNet-W32.yaml |
成功训练✌
1 | ... |
See [[FCSGG Repo Explanation]]
Repository:
official:
1 | conda env create -f conda.yaml |
不建议使用official的conda.yaml, 使用更改后的conda_cyl.yaml。
1 | pip install torch==2.0.0 torchvision==0.15.1 torchaudio==2.0.1 |
官方提供了 depth estimation 和 segmentation 的 notebook,可以找时间理解一下
使用的数据集为Imagenet-mini
1 | imagenet-mini |
Note: 需要额外添加一个label.txt
使用脚本生产数据集的meta data:
1 |
Semantic-SAM Repository Application

My repository: https://github.com/Chen-Yulin/Semantic-SAM
My venv: ssam
nvidia-smi返回的是driver所能支持的最新的cuda版本
系统安装的cuda版本可以随意,torch会优先使用虚拟环境中安装的cuda版本
安装指定版本cuda-toolkit
1 | conda install nvidia/label/cuda-12.4.0::cuda-toolkit -c nvidia/label/cuda-12.4.0 |
安装最新版本
1 | conda install cuda-toolkit |
某些仓库需要指定cuda路径才能编译包
1 | conda env config vars set LD_LIBRARY_PATH="/home/cyl/miniconda3/envs/gsam/lib/python3.10/site-packages/nvidia/cuda_runtime/lib/:$LD_LIBRARY_PATH" |
Note: 注意改变了库路径之后nvim中的lsp会报错,建议之后改回去
1 | conda env config vars set LD_LIBRARY_PATH="" |
Note: To find the correct path for CUDA_HOME use which nvcc. In my case, output of the command was:
1 | >>> which nvcc |
Therefore, I set the CUDA_HOME as /home/user/miniconda3/envs/py12/.
Note: To find the correct path for LD_LIBRARY_PATH use find ~ -name cuda_runtime_api.h. In my case, output of the command was:
1 | >>> find ~ -name cuda_runtime_api.h |
So I set the LD_LIBRARY_PATH as /home/user/miniconda3/envs/py12/targets/x86_64-linux/lib/ and CPATH as /home/user/miniconda3/envs/py12/targets/x86_64-linux/include/. If you have multiple CUDA installations, the output of find ~ -name cuda_runtime_api.h will display multiple paths. Make sure to choose the path that corresponds to the environment you have created.
ref:https://github.com/IDEA-Research/GroundingDINO/issues/355
Note: Always reboot the computer after the cuda is upgraded
Note: 在更改LD_LIBRARY_PATH后可能会导致neovim的pyright无法运行,所以建议在编译完成后设回该变量
1 | conda env config vars set LD_LIBRARY_PATH="" |
cudatoolkit和cuda-toolkit这两个可以同时安装
如果不安装cudatoolkit可能会在编译时出现ld: cannot find -lcudart: No such file or directory collect2: error: ld returned 1 exit status 报错
使用以下指令获取版本信息
1 | python -c 'import torch;print(torch.__version__);print(torch.version.cuda)' |
1 | 2.0.0+cu117 |