Deep Hierarchical Semantic Segmentation

CosyPose-- Consistent multi-view multi-object 6D pose estimation
Estimate accurate 6D poses of multiple known objects in a 3D scene captured by multiple cameras with unknown positions

AR2-D2 -- Training a Robot Without a Robot
机器人执行任务的视频数据集非常重要,特别是对于Visual Imitation Learning来说。
想要获得这些训练集视频,传统的方法是人工引导机器人做相关动作,然后再录制,耗费大量人力和时间成本,最关键的是机器人是固定在实验室内的,能接触到的物品和任务比较有限,因此这些训练数据中不包含更日常的场景。
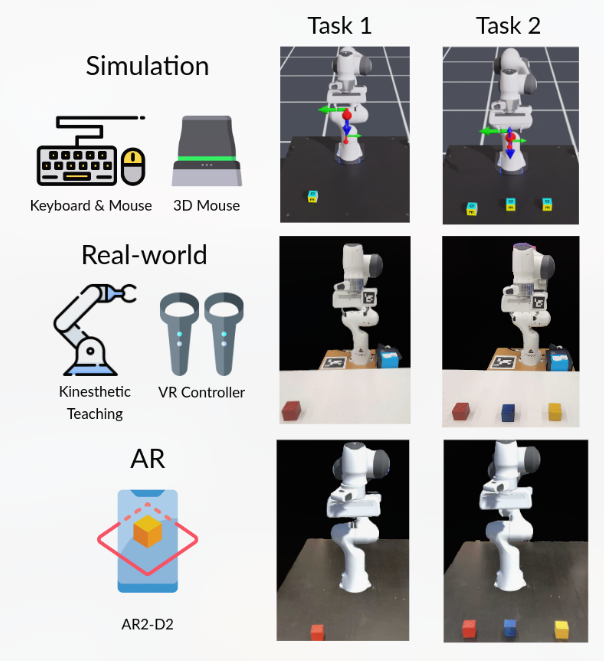
提出了一个IOS APP,可以通过追踪用户手部的动作在视频中生成一个执行动作的AR机器人。
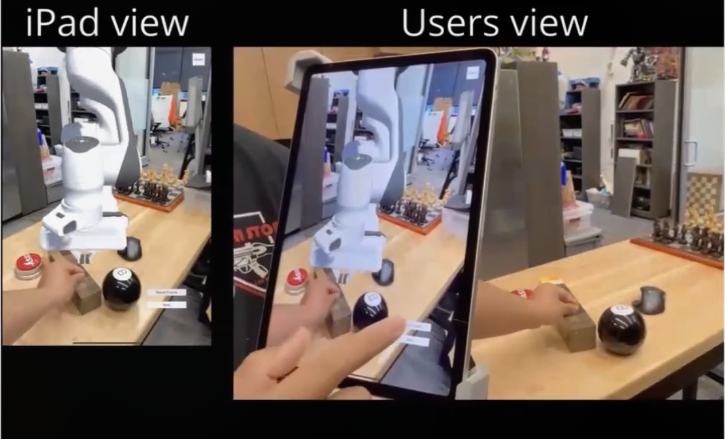
如上图,AR2-D2 的设计和实现由两个主要组件组成。第一个组件是一个手机应用程序,它将 AR 机器人投射到现实世界中,允许用户与物理对象和 AR 机器人进行交互。第二个组件将收集的视频转换为可用于训练不同行为克隆代理的格式,这些克隆代理随后可以部署在真实的机器人上。
Unity + AR Foundation kit(用于生成一个虚拟机械臂并布置在场景中)
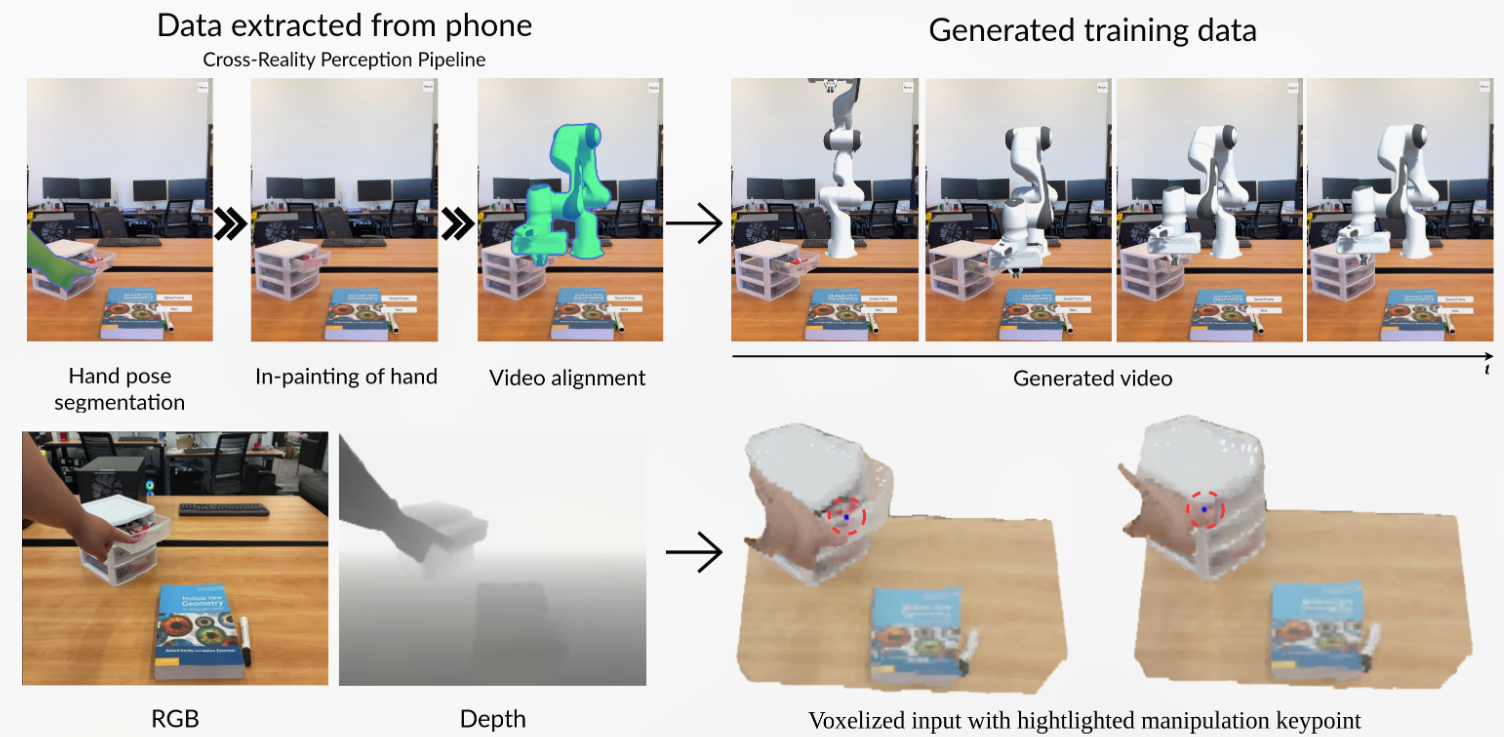
传感器:苹果设备摄像头和自带的LiDAR
通过ios自己的人手姿态算法和深度信息获取手部动作,由此获取机械臂需要运动到的关键点,并且可以让AR界面中的机械臂移动到指定位置。
得到APP生成的视频后消除人手并填补消除的区域(E2FGVI),就可以得到机械臂操作物体的视频,它可以用作基于视觉的模仿学习的训练数据。
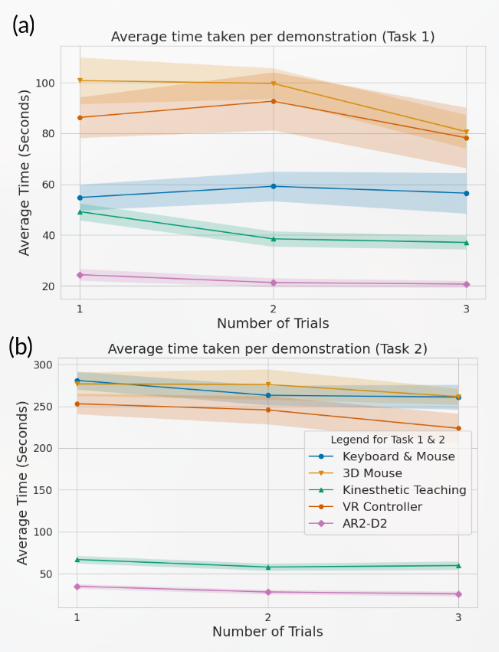
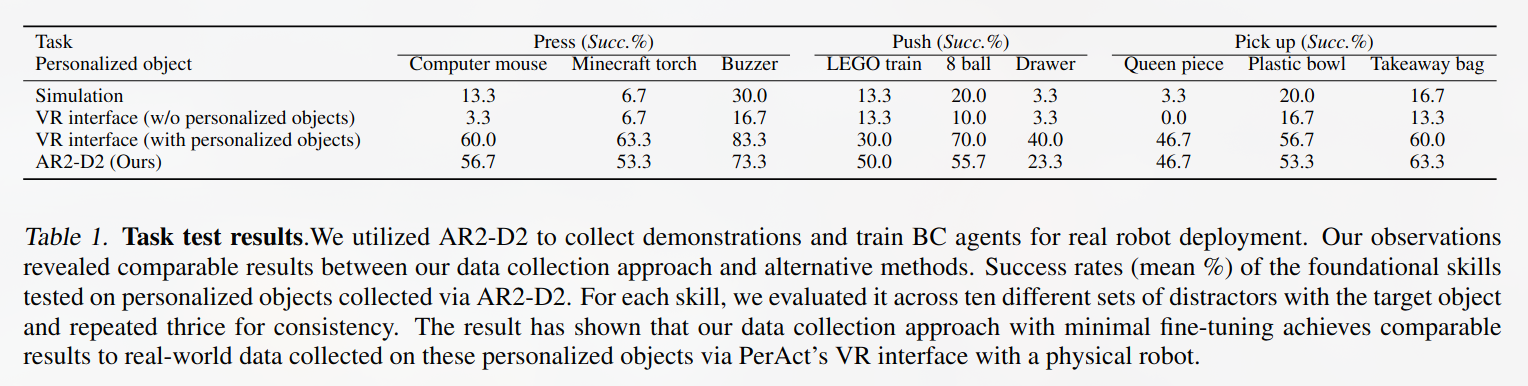
围绕三个常见的机器人任务收集演示:{press, push, pick up}
使用 Perciver-Actor (PERACT)训练基于 Transformer 的语言引导行为cloning policy
PERACT takes a 3D voxel observation and a language goal (v, l) as input and produces discretized outputs for translation, rotation, and gripper state of the end-effector. These outputs, coupled with a motion planner, enable the execution of the task specified by the language goal.
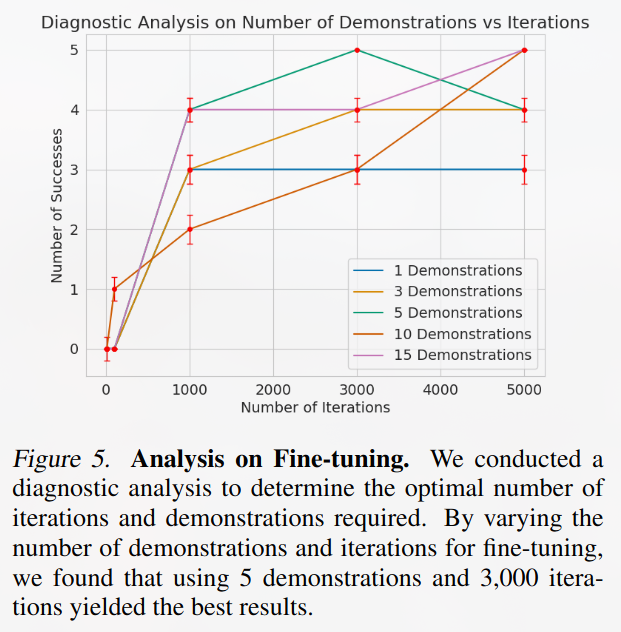
每一个agent执行一种任务({press, push, pick up}),先训练3k次,然后再微调训练(3k iteration),用于缩小iphone摄像机和agent使用的kinect v2相机之间的偏差。
微调结果
测试结果
Human-robot interaction for robotic manipulator programming in Mixed Reality
和我毕设很像的工作,居然已经发ICRA了?
虽然近些年有关AR在人机交互方面应用的研究有很多,但是这些研究大都缺少系统性的分析
Recently, an increasing number of studies in HCI, HRI, and robotics have demonstrated how AR enables better interactions between people and robots. However, often research remains focused on individual explorations and key design strategies, and research questions are rarely analyzed systematically.
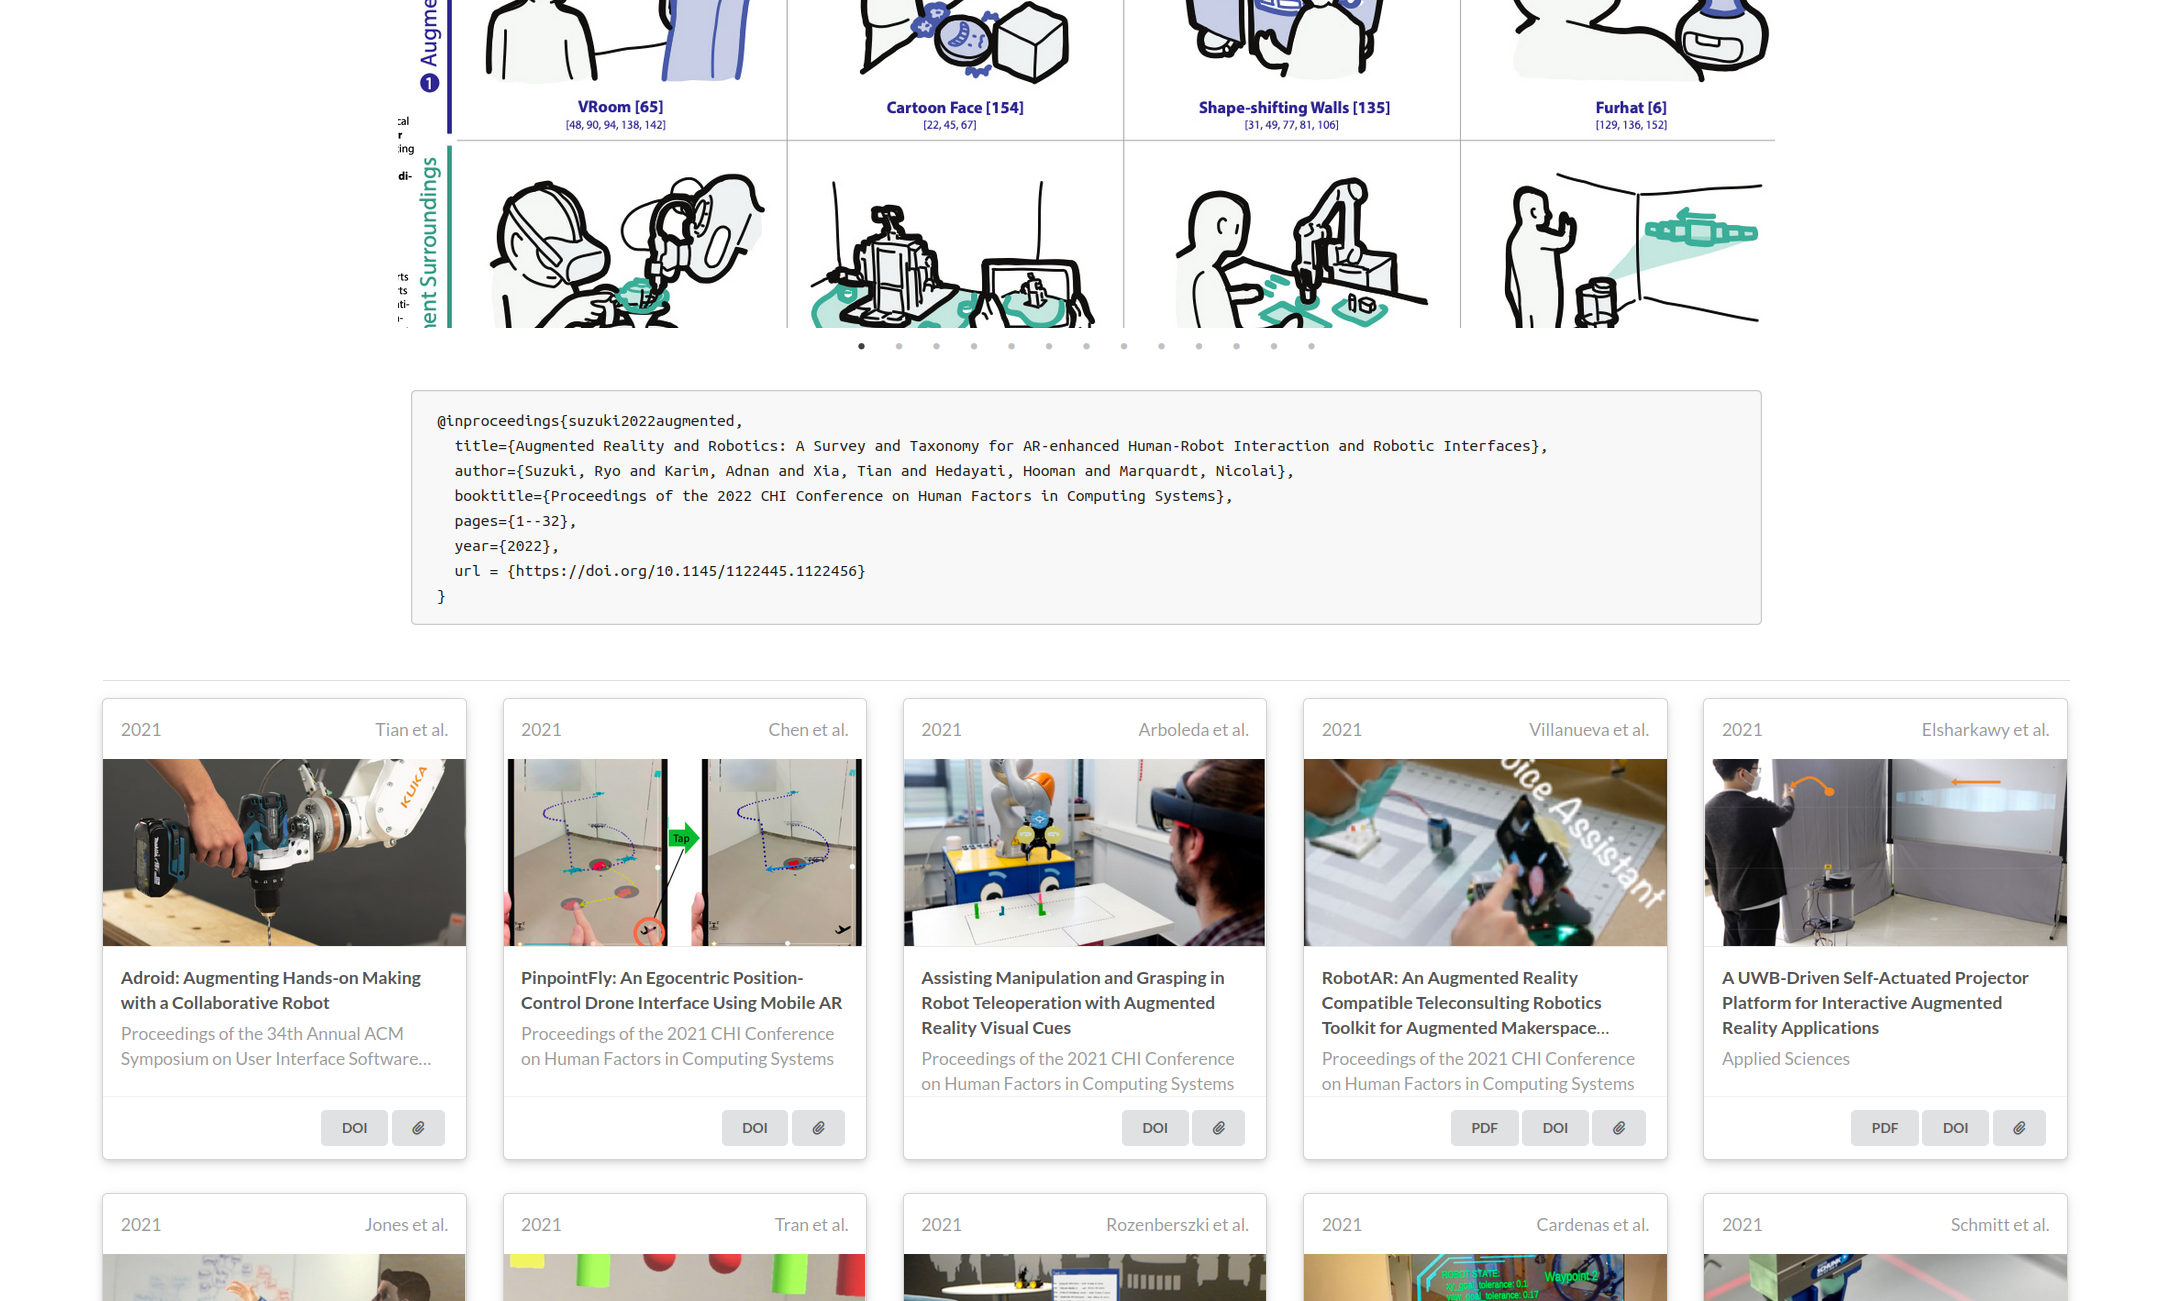
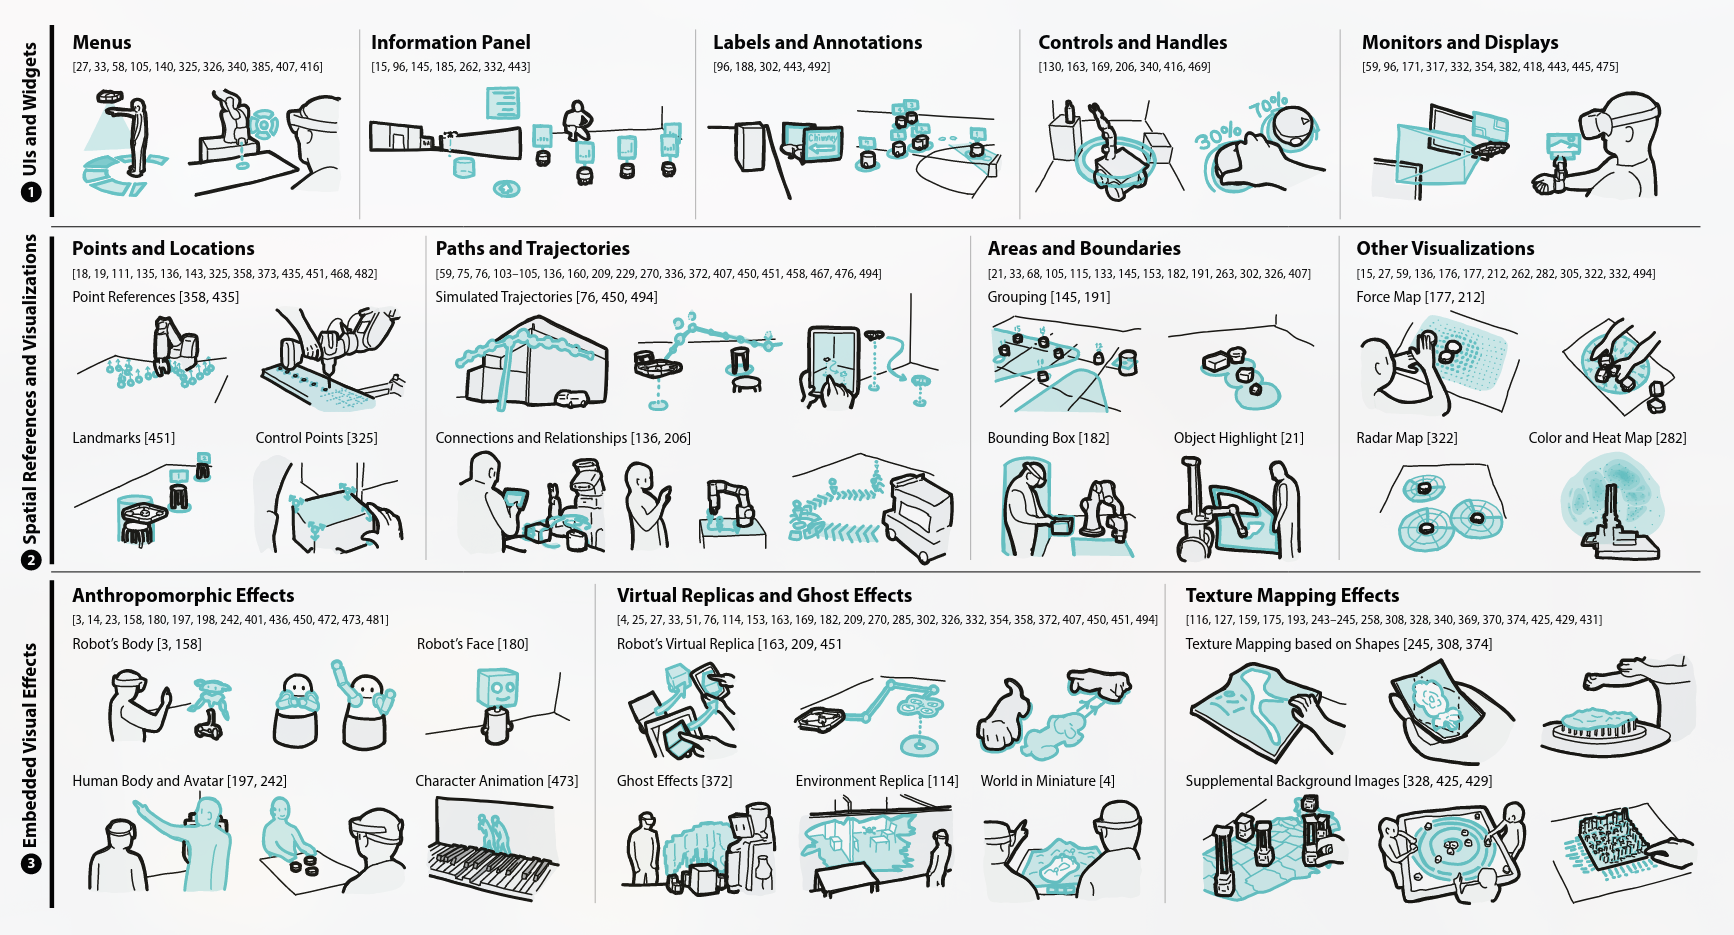
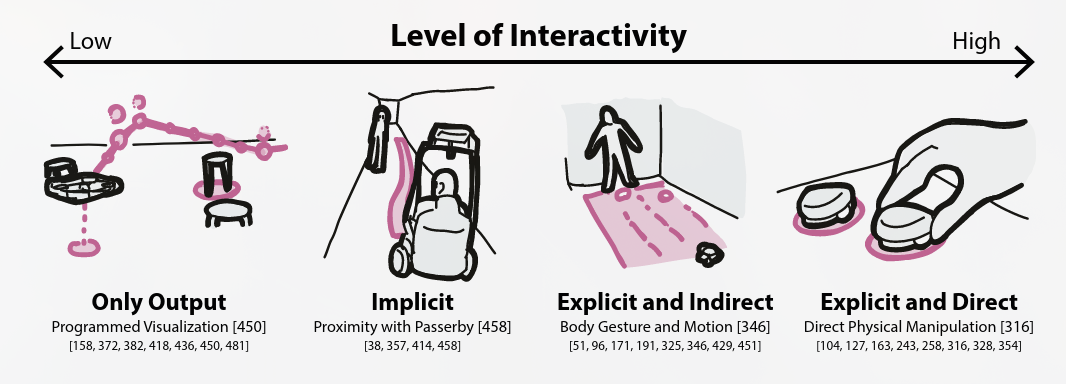
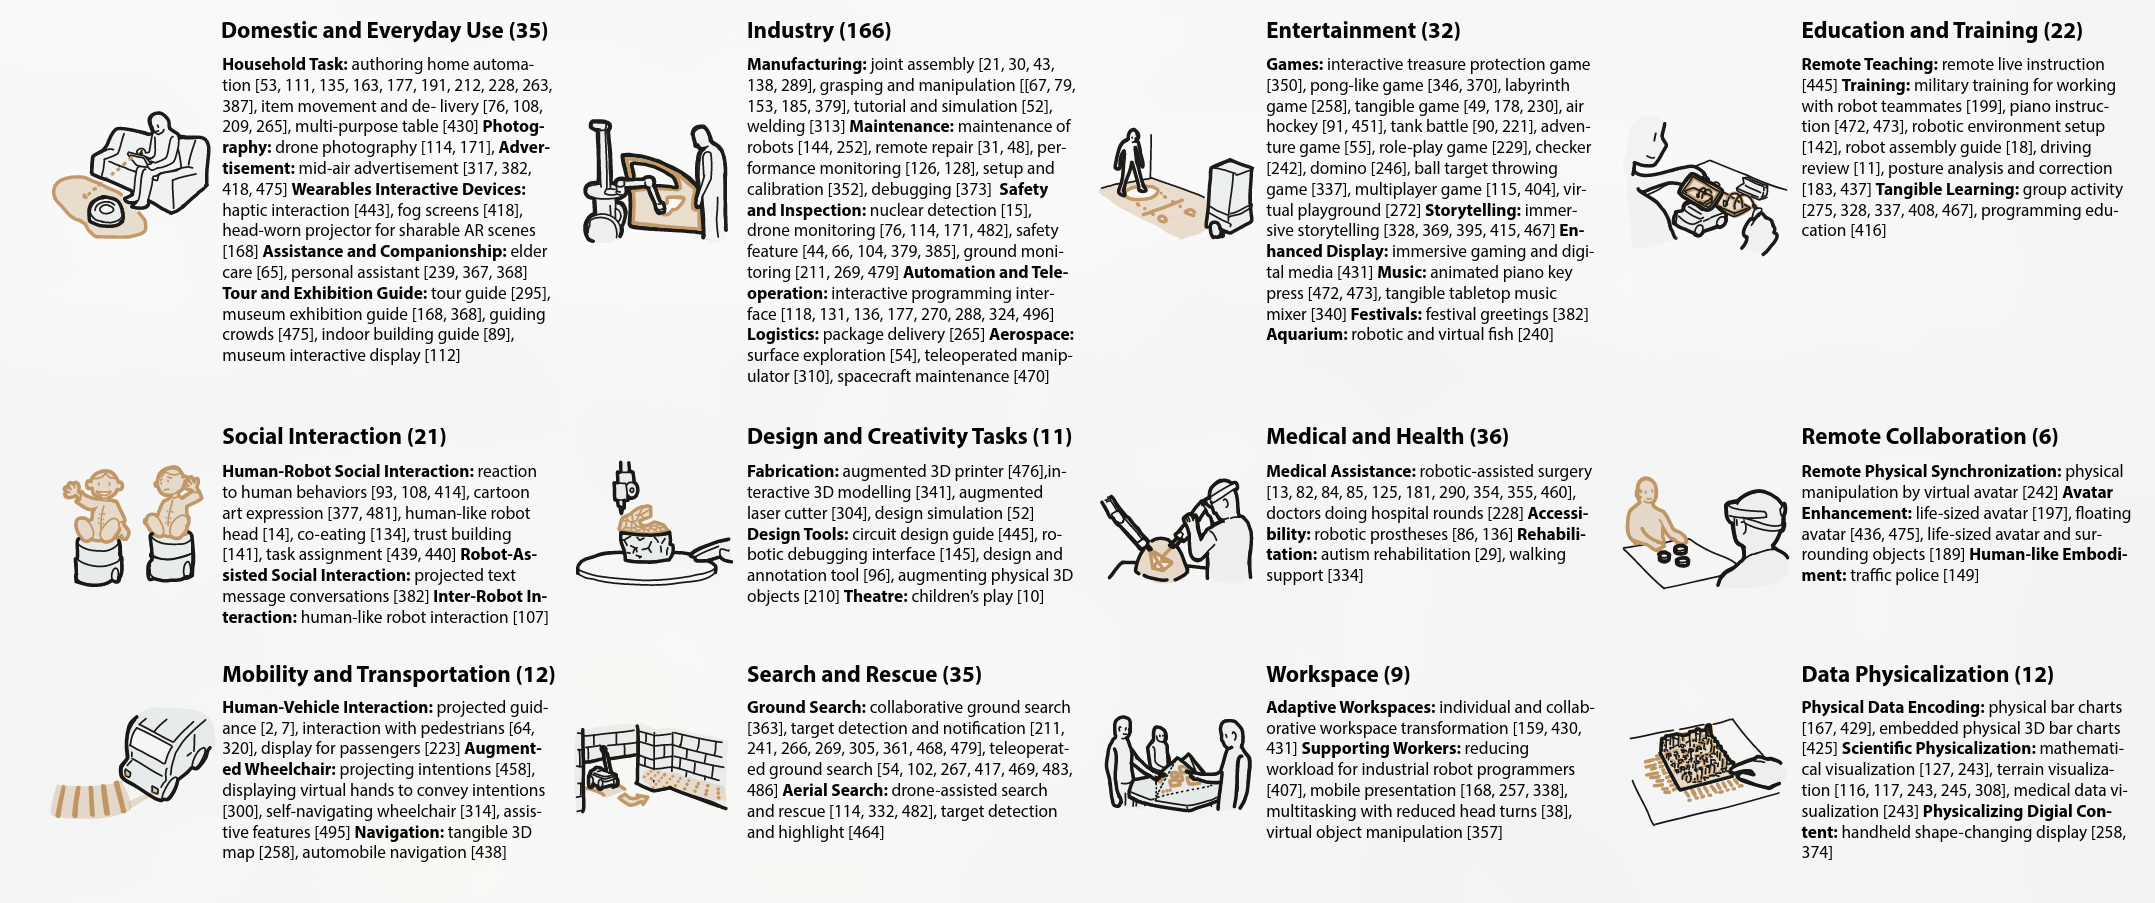
本文主要给目前AR人机交互领域做一下分类(基于460篇文章)
AR人机交互主要分为这几种研究维度

AR最大的优势就是能够提供超出物理限制的丰富视觉反馈,减少工人的认知负荷
这个研究最终的目标是提供一个对于该领域的共同基础和理解。
机器人系统不单指传统工业机器人,在本研究中,我们不局限于任一种机器人。
Robotic interfaces 主要指”Interfaces that use robots or other actuated systems as medium for HCI”.
该研究通过design space dimensions来呈现该领域的分类
拓宽了HCI和HRI的文献研究
讨论了促进该领域进一步研究的开放性研究问题和机会
有一个交互式网站 https://ilab.ucalgary.ca/ar-and-robotics/
根据增强现实硬件的布置位置(dimension 1),可以分为
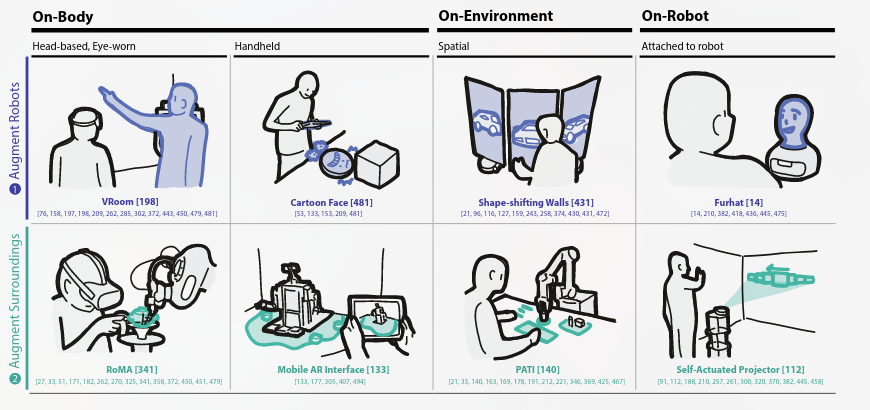

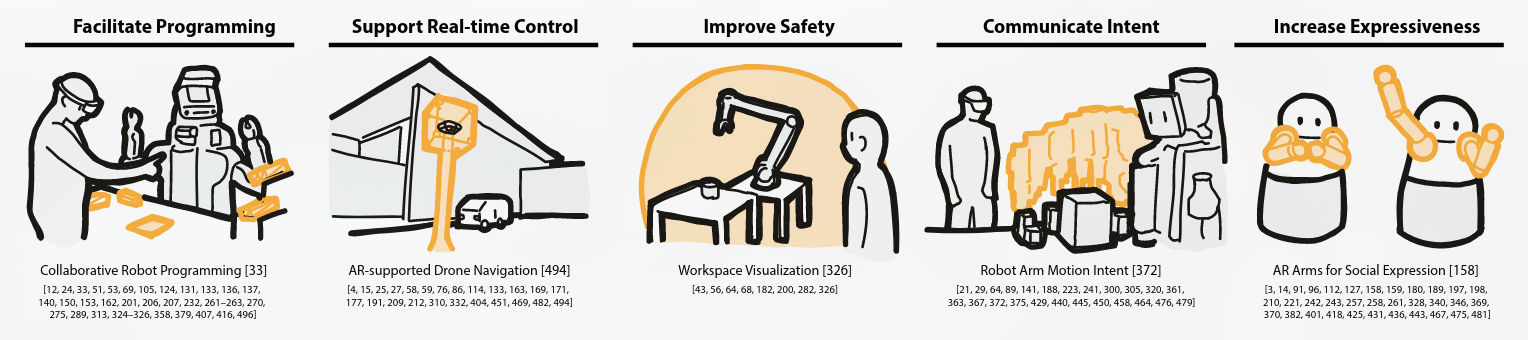
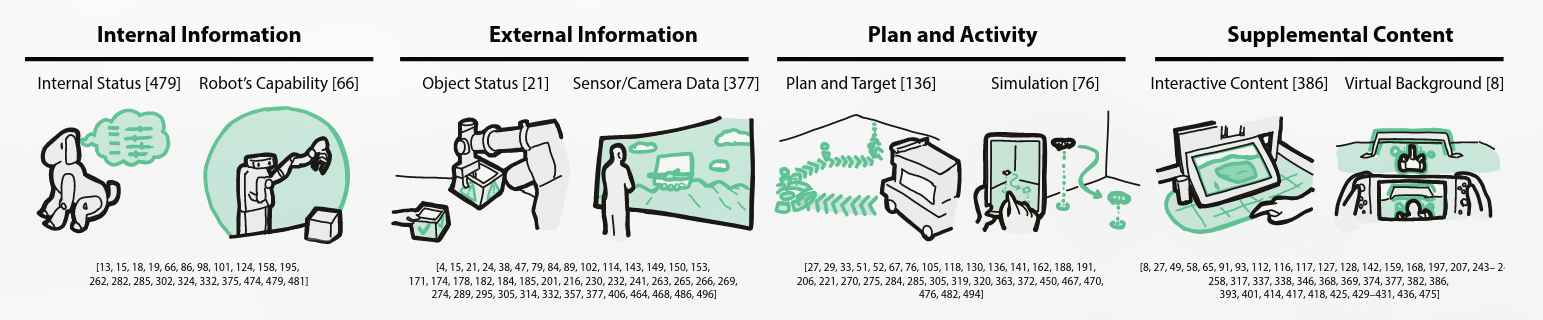
这篇主要讨论呈现AR内容的方式

联邦学习(Federated Learning, FL)作为一种新兴的分布式机器学习方法,已经引起了大量研究的关注。要系统地理解联邦学习的相关研究,建议遵循以下结构化的阅读图谱,以便逐步加深对其原理、应用和挑战的理解。
这些论文介绍了联邦学习的基本概念、目标、以及经典算法,是了解联邦学习的起点。
Konečnỳ, J., et al. (2016). “Federated Learning: Strategies for Improving Communication Efficiency” arXiv
McMahan, H. B., et al. (2017). “Communication-Efficient Learning of Deep Networks from Decentralized Data” arXiv
Yang, Q., Liu, Y., Cheng, Y., Kang, Y., Chen, T., & Yu, H. (2019). “Federated Learning” ACM Transactions on Intelligent Systems and Technology (TIST)
联邦学习的一个重要目标是确保数据的隐私和安全,这一领域的研究为其提供了理论基础和技术手段。
Bonawitz, K., et al. (2017). “Practical Secure Aggregation for Federated Learning on User-Held Data” arXiv
Geyer, R. C., Klein, T., & Nabi, M. (2017). “Differentially Private Federated Learning: A Client Level Perspective” arXiv
Zhao, Y., et al. (2018). “Federated Learning with Non-IID Data” arXiv
联邦学习中的通信和计算效率问题是该领域的关键研究方向,许多研究尝试通过各种方法优化模型训练过程中的资源消耗。
Li, X., et al. (2020). “Federated Optimization in Heterogeneous Networks” arXiv
Kairouz, P., et al. (2021). “Advances and Open Problems in Federated Learning” arXiv
Chen, M., et al. (2020). “Joint Learning and Communication Optimization for Federated Learning over Wireless Networks” arXiv
要更好地理解联邦学习在实际中的应用和系统架构,可以参考一些开源框架和实际实现案例。
Google AI. “Federated Learning for Mobile Keyboard Prediction” Blog Post
TensorFlow Federated (TFF): GitHub
联邦学习在诸多行业中都具有广泛的应用,了解这些应用有助于扩展对联邦学习实际意义的认识。
Rieke, N., et al. (2020). “The Future of Digital Health with Federated Learning” arXiv
Hard, A., et al. (2019). “Federated Learning for Mobile Keyboard Prediction” arXiv
对于未来的研究,联邦学习还面临许多挑战,比如系统异质性、模型性能与隐私保护的平衡等。
通过这个图谱,你可以系统地了解联邦学习的关键领域,并逐步深入到各个具体问题的解决方法与研究前沿。
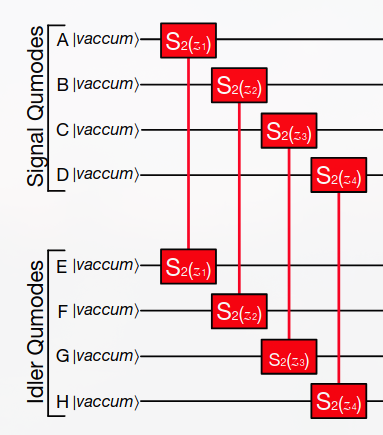
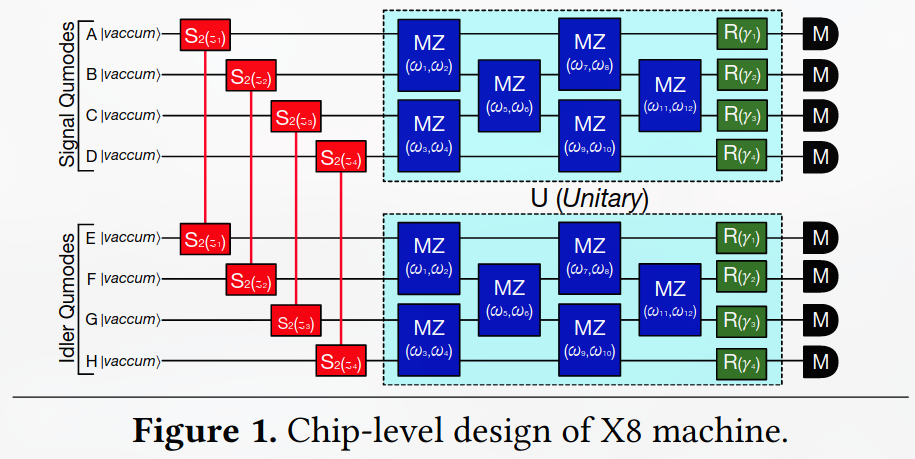
ProxiML -- Building Machine Learning Classifiers for Photonic Quantum Computing
https://dl.acm.org/doi/pdf/10.1145/3620666.3651367
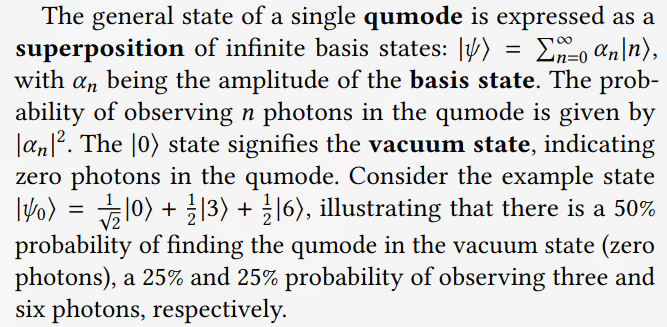
Qumodes are a different way of carrying and manipulating quantum information than qubits.
就像二进制在电脑中的encoding方式,总共n bit的内存,那必然只能有 $2^n$ 种内存state,这是由二进制0或1的特性决定的。然后在让我们看qubit和qumode
If we go to qubits, not much in this picture changes. While a qubit has infinitely many possible states, it turns out that you should look at what is called the basis of the state space, which loosely said means that you should find the minimal number of states in which you can express every other state. For a qubit, this turns out to be two, for example the up state and the down state. To use the language from above, each qubit therefore has 2 ‘possible assignments’, and you have n of them, so by the arguments presented above, there are $2^ⁿ$ unique states. Because we are doing quantum mechanics, superpositions of these states are also allowed, but that doesn’t change the picture: the dimensionality of the system is still $2^ⁿ$.
Qubits是由单个光子的量子态决定的,的存储维数限制依然是 $2^n$

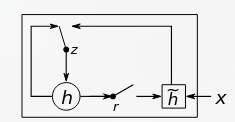
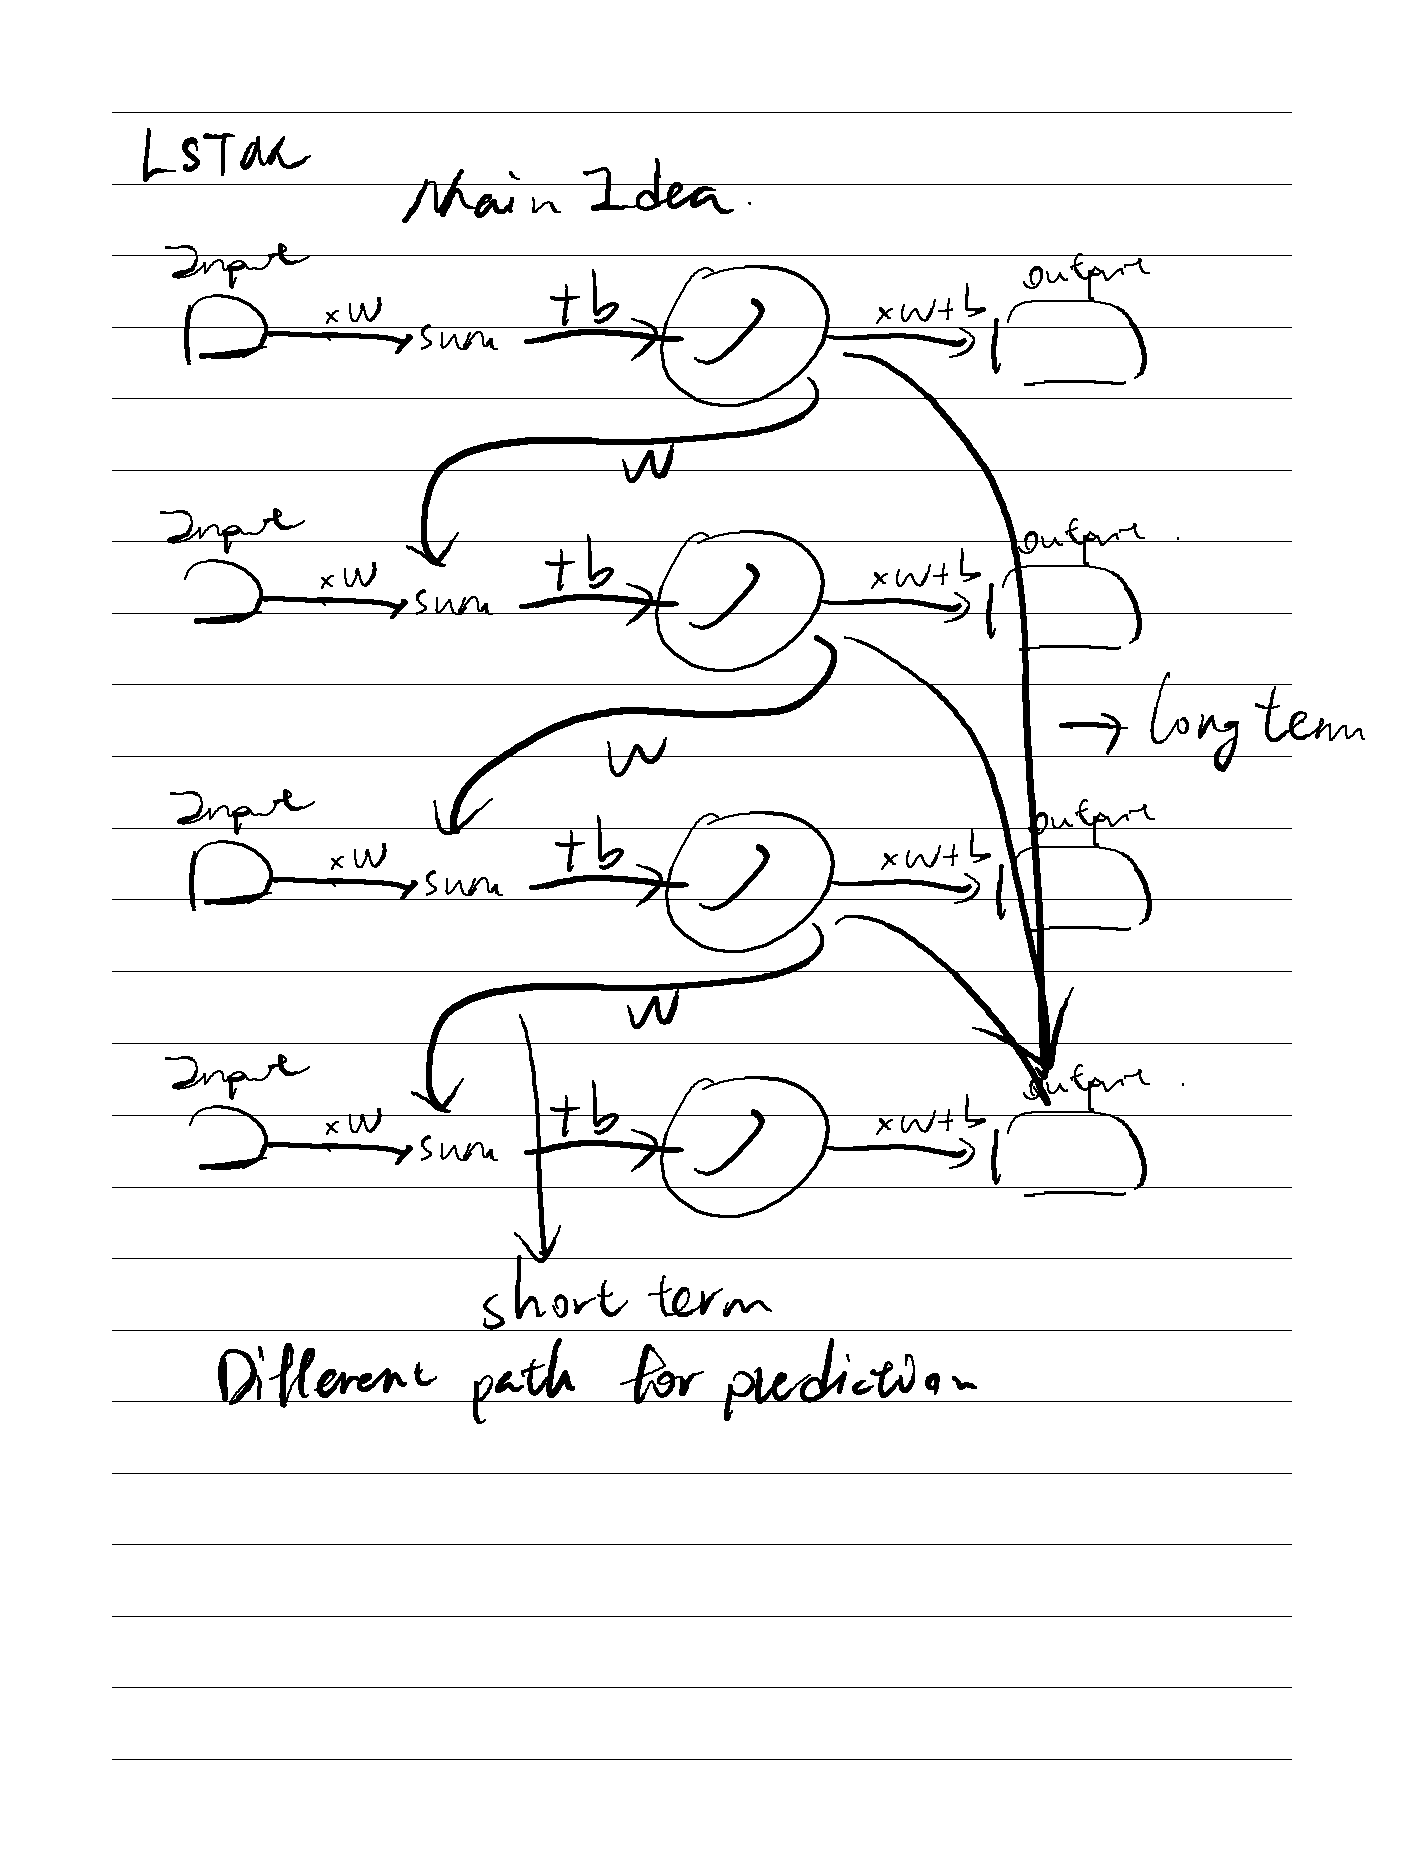
LSTM主要是用于解决递归网络中梯度指数级消失或者梯度爆炸的问题
https://www.youtube.com/watch?v=YCzL96nL7j0&t=267s
LSTM和RNN主要的区别就在于:LSTM有两条记忆链,一条短期记忆,一条长期记忆。

On the Properties of Neural Machine Translation= Encoder–Decoder Approaches
对比了 RNN Encoder-Decoder 和 GRU(new proposed)之间的翻译能力,发现GRU更具优势且能够理解语法。
因为会把要翻译的语句映射到固定长度的vector所以训练需要的内存空间是固定的且很小,500M和几十G形成对比。
但也有问题:
As this approach is relatively new, there has not been much work on analyzing the properties and behavior of these models. For instance: What are the properties of sentences on which this approach performs better? How does the choice of source/target vocabulary affect the performance? In which cases does the neural machine translation fail?
不够Fancy的地方:
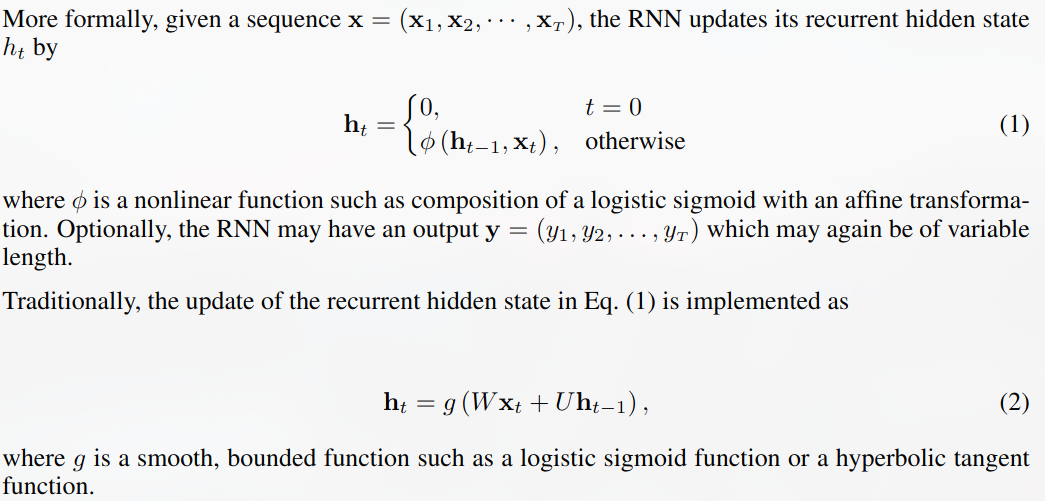
递归神经网络(RNN)在变长序列x = ( x1 , x2, … , xT)上通过保持隐藏状态h随时间变化而工作

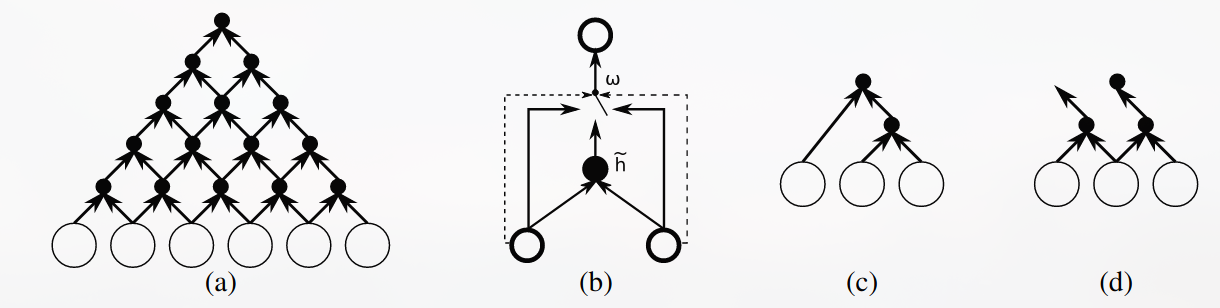
这是本文提出的用于替换RNN Encoder-Decoder 中的Encoder的一种新的神经网络,文中称为:gated recursive convolutional neural network (grConv)