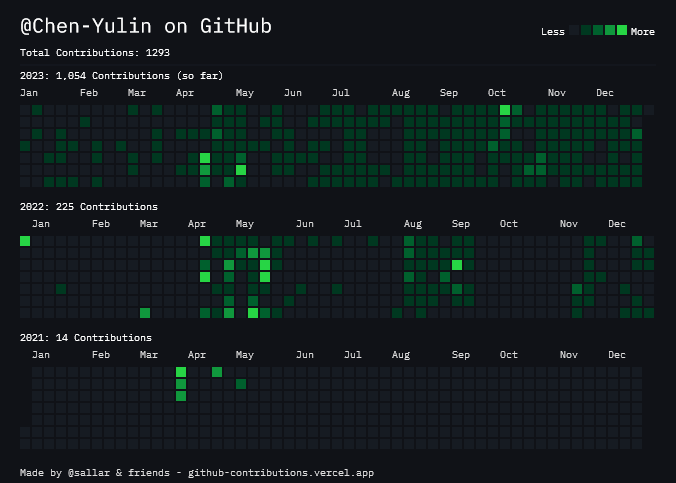
Chen Yulin's BlogChen Yulin's Blog
HomeArchivesCategoriesTagsAbout
Posted 2023-05-10Updated 2025-08-15a few seconds read (About 9 words)

SQL Basics

Practicing website

sql-practice

SQL Pandas
Posted 2023-05-10Updated 2025-08-15a few seconds read (About 27 words)

SQL Pandas

  • Environment
  • Example

Environment

Install package for sql

1
2
3
pip install sqlalchemy
pip install ibm_db_sa
pip install ipython-sql

Example

SemanticSegmentation
Posted 2023-05-10Updated 2025-08-156 minutes read (About 858 words)

SemanticSegmentation

  • 如何使用Shader实现语义分割
    • 什么是Shader
    • Shader代码的组成部分
    • 如何使用Shader实现语义分割

如何使用Shader实现语义分割

什么是Shader

Shader是一种计算机程序,它用于在图形渲染管线中处理顶点和像素。在Unity中,Shader可以用来控制物体的渲染方式,包括颜色、纹理、透明度等。Shader的工作流程是将材料(如纹理、数据、颜色等)通过加工展现在材质上的过程。

Unity中有多种类型的Shader,可以根据不同的情况使用。例如,在三维网格上使用的方式和图片上使用的方式会有区别。

Shader代码的组成部分

一个Unity Shader通常由以下几个部分组成:

  • Properties:这部分定义了Shader中可供用户在材质检查器中编辑的属性。例如,可以定义一个颜色属性,让用户可以在材质检查器中更改物体的颜色。

  • SubShader:每个Shader至少包含一个SubShader。SubShader定义了Shader的实际渲染操作。如果Shader需要支持多种不同的渲染硬件或渲染质量设置,可以在Shader中定义多个SubShader。

  • Pass:每个SubShader至少包含一个Pass。Pass定义了一次渲染操作,包括顶点和片段着色器的代码。可以在一个SubShader中定义多个Pass来实现多次渲染操作。

  • CGPROGRAM:这部分包含了顶点和片段着色器的代码。可以使用Cg/HLSL语言来编写着色器代码,并使用内置的变量和函数来访问物体的信息。

    1
    2
    3
    4
    5
    6
    7
    8
    9
    10
    11
    12
    13
    14
    15
    16
    17
    18
    19
    20
    21
    22
    23
    24
    25
    26
    27
    28
    29
    30
    31
    32
    33
    34
    35
    36
    Shader "Custom/SimpleColor" {
    Properties {
    _Color ("Color", Color) = (1,1,1,1)
    }
    SubShader {
    Tags { "RenderType"="Opaque" }
    LOD 100

    Pass {
    CGPROGRAM
    #pragma vertex vert
    #pragma fragment frag

    fixed4 _Color;

    struct appdata {
    float4 vertex : POSITION;
    };

    struct v2f {
    float4 vertex : SV_POSITION;
    };

    v2f vert (appdata v) {
    v2f o;
    o.vertex = UnityObjectToClipPos(v.vertex);
    return o;
    }

    fixed4 frag (v2f i) : SV_Target {
    return _Color;
    }
    ENDCG
    }
    }
    }

如何使用Shader实现语义分割

如果希望根据物体的标签来控制物体的颜色,可以在Shader中使用材质属性来实现。首先,需要在脚本中获取物体的标签信息,并根据标签信息设置物体材质的颜色属性。然后,在Shader中,可以使用这个颜色属性来控制物体的渲染颜色。

下面是一个简单的示例,它展示了如何在脚本中设置材质的颜色属性,并在Shader中使用该属性来控制物体的颜色:

1
2
3
4
5
6
7
8
9
10
11
12
13
14
15
16
17
18
19
20
21
22
23
24
25
26
27
28
29
30
31
32
33
34
35
36
37
38
39
40
41
42
43
44
45
46
47
48
49
50
51
52
53
54
55
56
57
58
59
60
// 脚本中设置材质的颜色属性
void Start()
{
Renderer renderer = GetComponent<Renderer>();
Material material = renderer.material;

// 根据物体的标签设置材质的颜色属性
if (CompareTag("Pedestrian"))
{
material.SetColor("_Color", Color.blue);
}
else if (CompareTag("Road"))
{
material.SetColor("_Color", Color.white);
}
else if (CompareTag("Building"))
{
material.SetColor("_Color", Color.black);
}
}
````

```c
// Shader中使用颜色属性来控制物体的颜色
Shader "Custom/SemanticSegmentation" {
Properties {
_Color ("Color", Color) = (1,1,1,1)
}
SubShader {
Tags { "RenderType"="Opaque" }
LOD 100

Pass {
CGPROGRAM
#pragma vertex vert
#pragma fragment frag

fixed4 _Color;

struct appdata {
float4 vertex : POSITION;
};

struct v2f {
float4 vertex : SV_POSITION;
};

v2f vert (appdata v) {
v2f o;
o.vertex = UnityObjectToClipPos(v.vertex);
return o;
}

fixed4 frag (v2f i) : SV_Target {
return _Color;
}
ENDCG
}
}
}
Implement Build-in Command in C
Posted 2023-05-10Updated 2025-08-153 minutes read (About 434 words)

Implement Build-in Command in C

Which are the build-in commands?

A shell built-in command is contained in the shell itself (implemented by shell author) and runs on the same shell without creating a new process, e.g. cd, pwd, exit, alias.

By contrast: For a regular(linux) command, it is run from a binary file (found in $PATH or specified file) by forking the existing process in a subshell, e.g. ls, cat, rm.

How to implement

1. Judge whether is build-in command

Assume we have already got the parsed arguments

char * parsedArgs[MAXPARSE].

For example, a input char * input = "cd .." can be parsed as char * parsedArgs[MAXPARSE] = {"cd", ".."}

Then, we just need to judge whether parsedArgs[0] is contained in our build-in command set {"exit", "cd", "pwd" ...} (by using strcmp)

2. Implementation

In this project (as of milestone 2) , we need to implement exit, pwd, cd.

exit

In Bash, exit is a built-in command used to terminate the current shell session (same in our mumsh).

Each running shell is a process, so we can use the exit() in stdlib.h to terminate the shell process, achieving the goal of exiting the shell.

1
2
3
4
void exec_exit(){
printf("exit\n");
exit(0); // 0 for exit normally, otherwise abnormally
}

pwd

Running a crude (or minimal?) shell and have no idea where you are? Just type pwd and it will print the name of the current/working directory.

In C, we can implement the similar functionality using the getcwd() in unistd.h.

if success, getcwd() will return the pointer to the result, else ( e.g. no enough space) return NULL

1
2
3
4
void exec_pwd(){
char buf[1024]; // memory space need for storage
printf("%s\n", getcwd(buf,sizeof(buf)));
}

However, the working directory is not guaranteed to be shorter than 1024, so we may need to dynamically allocate the buffer to suit the length.

1
2
3
4
5
6
7
8
9
10
11
12
13
14
15
16
17
int size = 100;
char *buffer = malloc(size);

while (getcwd(buffer, size) == NULL) {
if (errno == ERANGE) { // buffer too small
size *= 2;
buffer = realloc(buffer, size);
} else { // other error
...
free(buffer);
return 1;
}
}

printf("%s\n", buffer);

free(buffer);

cd

cd is used for changing working directory.

In C, we can implement the similar functionality using the chdir() in unistd.h.

if success, chdir() will return 0, else ( e.g. no such directory) return -1

1
2
3
void exec_cd(char * path){
chdir(path);
}

Very straight forward, but if we want to implement more advanced features of the cd command such as changing to the home directory or the previous directory, we would need to handle these cases manually.

For example, you could check if the argument is ~ or -, and then call chdir() with the appropriate path

Aircraft control policy
Posted 2023-05-10Updated 2025-08-155 minutes read (About 821 words)

Aircraft control policy

Aircraft control policy

State Variable

Intuitive

  • Aircraft
    • Rotation (in euler angle: x,y,z)
    • Position (In the world coordinate system:x,y,z)
    • Linear velocity (In the world coordinate system: x,y,z)
    • Angular velocity (In the world coordinate system: x,y,z)
    • Acceleration (In the world coordinate system:x,y,z)
  • Carrier Vessel Landing Runway
    • Position
    • Rotation (fixed)
    • Velocity (fixed)

Extensive

  • Aircraft
    • AoA (angle of attack 攻角)

Decision Variable

  • Aircraft
    • Pitch angle (control aircraft’s rotation along x axis)
    • Roll angle (control aircraft’s rotation along z axis)
    • Yaw angle (control aircraft’s rotation along y axis)
    • Throttle (control thrust)

Level 1 (Basic) Policy

Only contain the control over control surface (on control over throttle)

Attitude Control/Maintainance

Pitch(俯仰角) C/M

Function: KeepPitch()

Control the angle of horizontal tail (elevator)

  1. First keep the angle of elevator same with AoA(攻角), to avoid the disturbance of the horizontal tail on the attitide of the aircraft.

    1
    aircraft.PitchAngle = aircraft.AoA;

    这里的aircraft.PitchAngle指的是飞机升降舵的角度(下片为正)

  2. 根据当前俯仰角,俯仰速度,和目标俯仰角,调整升降舵面的角度

    1
    aircraft.PitchAngle += 5 * (p - aircraft.Pitch) / Mathf.Exp(10 * aircraft.PitchSpeed * Mathf.Sign(p - aircraft.Pitch));

Other Attitude C/M

与俯仰角类似(分别控制滚转舵面以及偏航舵面),不过不需要第一步

Level 2 Policy

Velocity Direction Control/Maintainance

Gliding Angle (下滑角)

Control the thrust of aircraft to change the angle of gliding

  1. 保持飞机的俯仰角不变(5度仰角)

    1
    KeepPitch(5f);
  2. 计算当前下滑角

    1
    float velAngle = 90 - Vector3.Angle(aircraft.rb.velocity, Vector3.up);
  3. 根据下滑角更改油门大小

    1
    aircraft.Thrust += (p - velAngle)/500f;

Level 3 Policy

Follow Trajectory

Vertical Approaching (竖直平面上接近预定下滑道)

通过调整飞机的下滑角来使飞机在竖直面上接近并维持在理想的下滑道

  1. 计算偏差对应的向量
    1
    Vector3 approachDirection = Vector3.ProjectOnPlane(route.Destination - transform.position, route.direction);
  2. 根据偏差值调整下滑角的大小(-3为目标下滑轨道的下滑角)
    1
    ThrustKeepGliding(-3 + Mathf.Clamp(approachDirection.y / 10f, -5,5));

Horizontal Approaching (水平面上接近预定下滑道)

通过调整飞机的偏航舵面角度(进而影响飞机的y轴rotation)来使飞机在水平面上接近并维持在理想的航道上

  1. 计算偏差对应的向量
    1
    2
    3
    4
    5
    6
    7
    8
    9
    10
    11
    Vector3 approachDirection = Vector3.ProjectOnPlane(route.Destination - transform.position, route.direction);
    float distance = 0;

    if (Vector3.Angle(approachDirection, transform.right) < 90)
    {
    distance = Vector3.ProjectOnPlane(approachDirection, Vector3.up).magnitude;
    }
    else
    {
    distance = -Vector3.ProjectOnPlane(approachDirection, Vector3.up).magnitude;
    }
  2. 根据偏差值调整飞机的目标偏航角度(-8为目标下滑轨道的偏航角度)
    1
    KeepYaw(-8 + Mathf.Clamp(distance / 10f, -50, 50));

Get the ideal trajectory(补充)

基本的策略以及阐述完毕,那么所谓的理想下滑道到底应该怎么得到呢?
理想下滑道是一个射线,包含一个终点(飞机着陆的终点)和一个方向(飞机接近的方向)

1
2
3
4
5
public class Target_Route
{
public Vector3 Destination;
public Vector3 direction;
}

理想航道的偏航角和下滑角已知(分别为-8(平行于着陆跑道)和-3)
通过迭代飞机着陆所需时间来求得下滑道终点的位置

1
2
3
4
5
6
7
8
9
10
11
12
route.Destination = CV.transform.position;
route.direction = new Vector3(-0.14f, -0.05f, 0.99f).normalized;
// 获取飞机速度在下滑道方向上投影的大小
float axialVel = Vector3.Dot(aircraft.rb.velocity, route.direction);

// calculate precise destination
float FlightTime = 0;
for (int i = 0; i < 10; i++)
{
FlightTime = Vector3.Dot(route.Destination - aircraft.transform.position,route.direction) / axialVel;// 获取预计到达终点需要的时间
route.Destination = CV.transform.position + 15 * FlightTime * Vector3.forward; // 其中15是航母的速度,Vector3.forward是航母前进方向
}
Posted 2023-05-10Updated 2025-08-153 minutes read (About 518 words)

autonomousDriving

Autonomous Driving

  • Autonomous Driving
    • Perception
    • Decision-making
      • Architecture
        • Pre-trip decisions
        • In-trip decisions
        • Post-trip decision
    • Speed tracking
      • Dynamic system
        • Open-loop control
        • Closed-loop control
          • Linear controller
      • LTI system
        • Control of LTI system
    • Speed tracking
    • Trajectory tracking
      • Control policy

Perception

  • Navigation tool
  • Camera
  • Radar
  • LiDAR
  • Infrared detector
  • Speedometer
  • veh-veh communication
  • veh-infrastructure communication

Decision-making

  • departure time
  • good route
  • good lane
  • driving style
  • way to accel/decel
  • make a turn
  • park location

Architecture

  • Pre-trip

    trip generation, modal choice, routine choice

  • In-trip

    Path planning, Maneuver regulation

  • Post-trip

    Parking

Pre-trip decisions

  • Centralized

    central command center send instructions
    Some win, some lose

  • Decentralized

    plan trip independently, selfish
    little communication
    Sometime efficient, sometime inefficient

In-trip decisions

  • offline info

    static, in form of map

  • online info

    enable the route to be adapted to changing traffic conditions

Post-trip decision

Speed tracking

Dynamic system

  • State Variable

    $v[t]$

  • State space

    $R>= 0$

  • Control input

    $u[t]$(accel)

  • System dynamic

    $v[t+dt] = v[t]+u[t]*dt$

Open-loop control

Specify the control input $u[t]$ for all t in $[0,T]$
not a good idea for autonomous driving.

In practice, we need to consider the uncertainty of the system.
We should have:
$$
v[t+dt]=v[t]+u[t]dt+w(t)
$$
Where w(t) is the noise term capturing the uncertainty of the system.

Closed-loop control

Specify the control input $u[t]$ as a function of the state $v[t]$
able to adapt to the uncertainty of the system.
Compare the state $v[t]$ with the desired state $v_desired[t]$
Essentially, we need a mapping from state to control input
like map speed to acceleration
$$
v[t+dt]=v[t]+mu[v[t]]dt+w(t)
$$

Linear controller

the $u[t]$ has linear relationship with $v[t]$
$$
\mu[v] = k[v-v_{desired}]
$$

LTI system

linear time-invariant

Control of LTI system

exponential convergence is stronger than asymptotic convergent
if LTI system is asymptotic convergent, it is also exponential convergent
$$
x[t+1]=ax[t]+bu[t]
$$

Speed tracking

  • given:

    $v_{desired}, \delta$

  • determine:

    $u[t]$ $t = 0,1,2$

  • state

    $v[t]$
    $v[t+1] = v[t] + u[t]\delta + w[t]$

select $u[t]$ so that $w[t]$ will not accumulate

$u[t]=\mu(v[t]) = kv[t]$

$$
v[t+1] = f(v[t],u[t])
$$

Remember the review question

Trajectory tracking

Overview:

  • track means asymptotic convergent

  • $x[t]$ and $x_{desired}[t]$

  • $\lim_{t\rightarrow\infty}|x[t]-x_{desired}[t] | = 0$

  • state of system:$[x[t], v[t]]^T$

  • if successful:
    $$
    [x[t], v[t]]^T \rightarrow [x_{desired}[t], v_{desired}[t]]^T
    $$

Control policy

  • A control policy is a function
  • This function maps a state to a control input
    $$
    u[t] = f(x[t],v[t])
    $$

$$
u[t] = -k_1(x[t]-x_{desired}[t])-k_2(v[t]-v_{desired}[t])
$$

$$
k_1,k_2>0
$$

Posted 2023-05-10Updated 2025-08-15a few seconds read (About 11 words)

SpeechRater

TOEFL SPEECH

Practice

official 80 exercise

Posted 2023-05-10Updated 2025-08-15a few seconds read (About 75 words)

2023 Christmas

可供参考的资料

聊天记录:

  • 《照明商店》
  • 避开巨多人
  • WOKKA 舒芙蕾店,点评
  • 冰激凌店, 表
  • 武康路

武康路

Prefab
Posted 2023-05-10Updated 2025-08-152 minutes read (About 333 words)

Prefab

Prefabs in Unity

A prefab is a template for a game object that can be reused across multiple scenes. Using prefabs can help build scenes faster because a prefab can be created and then reused across multiple scenes without having to recreate the same game object each time.

Creating Prefabs

To create a prefab, first create a game object in the Hierarchy window and add components and child game objects to it until it looks like the desired prefab. Then drag the game object from the Hierarchy window to the Assets folder in the Project window. This will turn the game object into a prefab that can be reused across multiple scenes.

An empty prefab can also be created by right-clicking in the Project window and selecting Create > Prefab, and then editing it in the Inspector window.

Instantiating Prefabs in Scripts

To instantiate an existing prefab in a script, first create a public variable in the script to reference the prefab, and then drag the prefab onto that variable in the Inspector window. For example:

1
2
3
4
5
6
public GameObject myPrefab;

void Start()
{
Instantiate(myPrefab, new Vector3(0, 0, 0), Quaternion.identity);
}

The above code creates a public variable named myPrefab and uses the Instantiate method in the Start method to create an instance of the prefab. The prefab can be dragged onto the myPrefab variable in the Inspector window so that it is instantiated at runtime.

To instantiate a prefab from the Assets folder in a script, use the Resources.Load method to load the prefab and then use the Instantiate method to instantiate it. For example:

1
2
3
4
5
void Start()
{
GameObject myPrefab = Resources.Load<GameObject>("MyPrefab");
Instantiate(myPrefab, new Vector3(0, 0, 0), Quaternion.identity);
}

The above code uses the Resources.Load method to load a prefab named MyPrefab from the Resources folder in the Assets folder and then uses the Instantiate method to create an instance of the prefab.

Note: To use the Resources.Load method, the prefab must be located in a Resources folder within the Assets folder.

RoadArchitect
Posted 2023-05-10Updated 2025-08-15a few seconds read (About 25 words)

RoadArchitect

Trouble shooting

  1. Pink material
    • Install Universal RP in package manager
    • Edit/Rendering/Materials/Convert…
    • or what about try this fork
Previous
Next
  • 1
  • …
  • 23
  • 24
  • 25
  • 26
  • 27
  • 28
Chen Yulin

Chen Yulin

SJTU student

Manchester by the Sea

Posts

276

Categories

10

Tags

194

Follow

Archives

  • August 20252
  • July 20255
  • June 20256
  • May 202510
  • April 202517
  • March 202545
  • February 202512
  • January 202513
  • December 202412
  • November 20244
  • October 202418
  • September 202416
  • August 202413
  • July 20243
  • June 20245
  • May 202413
  • April 202417
  • March 20241
  • January 20241
  • December 20231
  • May 202346
  • August 20221
  • May 20226
  • April 20229

Recents

RAG-Graph

2025-08-13

RAG-Graph

Note

LangChain and LangGraph

2025-08-13

LangChain and LangGraph

Note

KAF Training

2025-07-18

KAF Training

Note

2025-07-17

MATH6003J Project Proposal

Note

2025-07-14

Math6003 Hw5

Note

Tags

3D-Scene4
6-D3
AI12
AIGC1
API1
AR2
Academic1
Algorithm1
Aliyun1
App2
Atlas1
BS41
Beautify1
Behaviorism1
Business1
C1
CADC1
CD1
CLIP5
CNN1
CV29
Capstone10
Communication2
Contrastive-Learning3
Control2
Csharp9
Css1
Cuda3
DD1
DINO4
DT1
Dataframe1
Debate5
Debugger1
Diffusion1
Discrete-Mathematics1
Disney1
Docker1
Docs2
Dynamic-programming1
ESP322
Education1
Embeded-System9
Embodied-AI8
Emoation1
Emotion13
Ethic1
FL1
FPN2
Family1
Federated-Learning1
Foundation1
Functional programming1
GPT3
Game5
Gated-NN2
Git7
Github1
Godot3
Graph1
HPC1
HRI2
Haskell1
Health2
Hexo10
Hierarchical1
Html5
Humanism1
Hyprland2
IK1
Image-Grounding1
Image-Text5
Image-generation1
ImitationLearning3
Jolt1
Json1
LLM13
LSP2
Latex2
Life4
LinearAlgebra1
Linux22
Live2d1
Love4
Lua1
MBTI1
ML8
MR/AR3
Mason1
Math6
Meme1
Message-Passing1
Mod3
Motivation1
Movie1
Multi-Agent1
Multi-modal6
Multi-view1
Music5
NLP4
NN5
Network2
Nodejs5
Numpy1
Nvim9
Object-Detection4
Open-Vocabulary9
OpenCV1
Oral1
PHD1
PSY5
Pandas2
Panoptic1
Path1
Philosophy3
PhysX1
Physical-Scene4
Physics-engine1
Pio2
Planning1
Plugin8
PoseEstimation3
Postgraduate1
Prefab1
Probability1
Python28
Pytorch1
QML1
Quantum1
RAG1
RNN4
ROS3
Reading19
Real2Sim1
Reconstruct9
Regex2
Reinforcement-learning1
Repository5
Representation-Learning1
Research-paper86
Robot1
Robotics16
SJTU-Lecture1
SQL2
SSH3
Scene-graph29
Scene-synthesis1
Science-fiction1
Scrap1
Script2
Segmentation7
Semantic12
Shader3
Shell4
Signals and Systems1
Sim2Real1
Sklearn1
Snippets1
Society4
Star-rail1
Subgraph1
Submodule1
Supervised-learning2
Survey3
TC1
TOEFL1
Task-Planning6
Tasks4
Tech Communication1
Torch5
Transformer11
Translation-Embedding2
Travel3
Unity20
Unsupervised-learning1
VLM6
VLP2
Version-management1
ViT4
VideoEditing2
Vim1
Visual-Relation20
WSL1
Waybar1
Wayland1
Web1
Website1
Well-being1
Window-manager2
YKLL3
Zen2
🍰1
🐱2
🧀1
Chen Yulin's BlogChen Yulin's Blog

© 2025 Chen Yulin  Powered by Hexo & Icarus

×